· 6 min read
Efficiently Connect Components with Redux and Other Stores
A state management library like Redux, Recoil, etc., can help you manage application state for large applications. These come with their own set of challenges that can be eliminated with good design.
A state management library like Redux, Recoil, etc., can help you manage application state for large applications. These come with its own set of challenges. In this post, I’ll explain how you can connect your components to the store and how to do it most effectively while ensuring our front end does not break.
Why does connecting components to stores lead to higher performance?
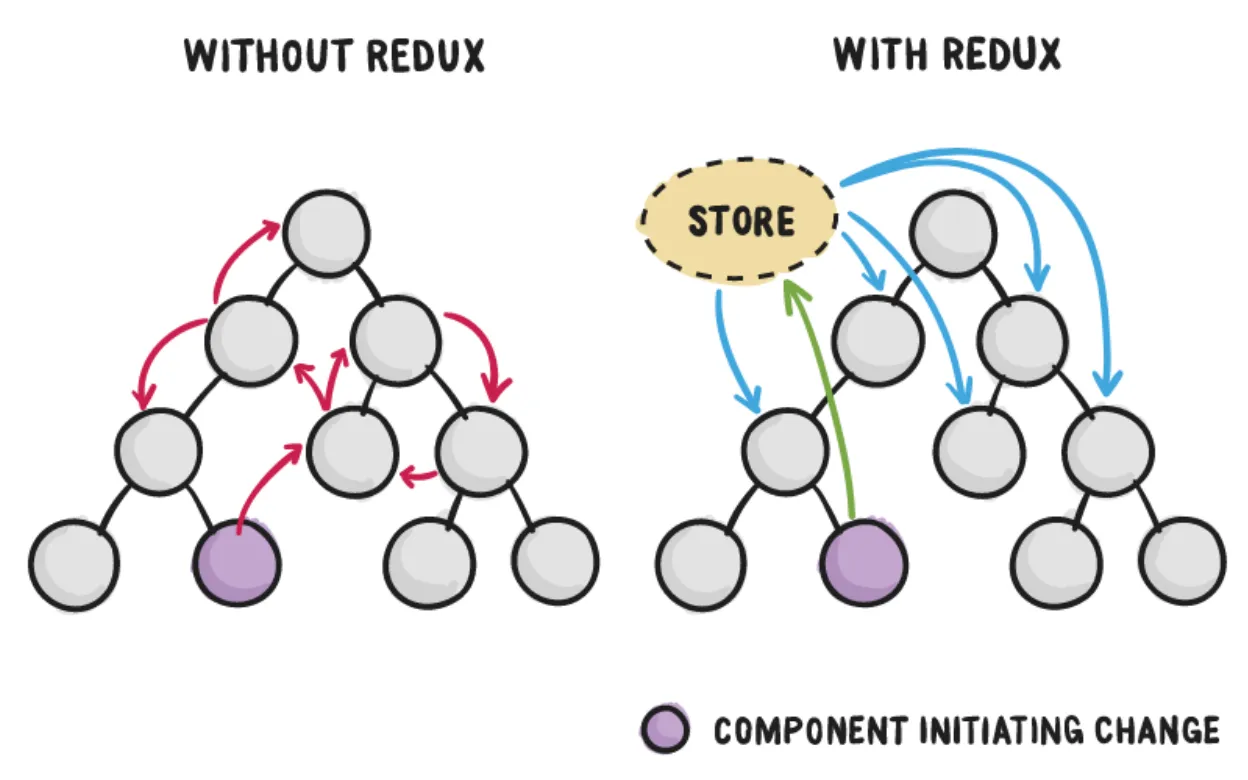
You’d have to connect every component directly to the store to have a high-performance UI with Redux or any other state management library.
Connecting components means that that component can itself get the data directly from the store rather than data being passed as props.
If data is passed as props, you’d have to write a lot of custom logic to reduce rerendering. If a component is connected, it will likely get rerendered only when data in the component gets changed.
If you pass a lot of data as props, it’s called prop drilling. Prop Drilling is
- low performance: because components can easily get rerendered
- high maintenance: passing each prop to the child component. If the number of props increases, it gets harder and harder.
Therefore, even Redux documentation suggests having as many components connected to the Redux store as possible.
This way, components can be directly communicated from the redux store.
How do you connect components to the store?
Step 1: Create Reducers, Selectors and Thunks
Assuming you have newly introduced a state management library, create your reducers, selectors and thunks separately.
You don’t need to start the browser to be able to test if the reducers, selectors and thunks are working. (Create everything in your tests).
You can follow my guidelines on how to create high-performance normalized stores here.
You can refer to my guide for creating Reducers, Selectors, Thunks and Testing redux.
###Testing: Load up the store during API calls
At places where you call the rest, APIs put those data in the store.
For example, suppose a parent component calls REST API to fetch a list of movies. The parents save in their own state. In such a code, add a list to add this fetched data into the store.
Before connecting each component, we want to ensure our store has all the data necessary.
So, find all the APIs and ensure the data returned from the server is within redux.
Step 3: Create selector functions
Selector Functions are functions that can be used to select data from the store.
These functions wrap up the store schema, so only these functions need to be updated whenever the schema is updated.
For example, consider our movie store looking like this.
movies: {
  byId: {
    "movie-1": {
      "name": "James Bond"
    }
  }
}
Suppose a component wants to get data for this movie-1.
Bad
Here, components get coupled to state in redux as it has to know the schema.
const ChildComponent = (props)=> {
  const movie = useSelector(state => state.movies.byId[props.movieId])
  return <div>{movie.movieName}</div>
}
Good
Create a separate MovieSelectors.ts file.
export const selectMovieById = (movieId) => (state) => state.movies.byId[props.movieId];Here, Components do not get coupled to the schema in the store.
const ChildComponent = (props)=> {
  const movie = useSelector(selectMovieById(props.movieId))
  return <div>{movie.movieName}</div>
}
Best
If you are using functional components, then you can also create custom hooks and encapsulate the entire state management logic as described in this article: How To Not Have A Mess with React Hooks & Redux
Create a separate hooks class.
const useMovie = movieId => {
  const movie = useSelector(selectMovieById(movieId))
  ... you can add other selectors or other dispatchers
  return {movie}
}
ChildComponent.ts
In this code, the child isn’t aware of the state management library. You can change between state management libraries within the hook, and child code won’t have to change. This makes your code very modular.
const ChildComponent = (props)=> {
  const movie = useMovie(props.movieId)
  return <div>{movie.movieName}</div>
}
Wrapping up selector functions
When you have a selector function or custom hooks, you can rapidly go through components and select data from the redux store for use.
Good selector functions are a must-have and should not be ignored.
Step 3: Start connecting components at the leaf node first. Then move upwards
When connecting components, start with the lowest leaf node component.
For example, if you have a component structure like
- Parent Components
- Child 1
- Grand Child 1
- Grand Child 2
- Child 2
- Grand Child 3
- Grand Grand Child 4
- Grand Child 4
- Grand Child 3
- Child 1
Start by connecting the Grand Grand Child 4 component first. This is because connecting the leaf components is easy as they are independent.
If you connect a dependent component first, you must ensure all child components are also connected. This will not be helpful.
Step 4: Only pass IDs between components. Let the component get the data from redux.
There are two reasons for this:
1. Serializability
In JavaScript, certain types are serializable, for example, strings and numbers.
Therefore
'string1' === 'string1'; // returns true
1 === 2; // return false
Some types are not serializable, like objects.
{"name": "Bond"} === {"name": "Bond"} // returns falseTherefore, make sure IDs are passed between components.
2. Connecting components
If data is available in the store, we want the component to directly get data from the store rather than being passed as props.
Code Sample
Bad:
Here, movie is an object.
const ParentComponent = (props) => {
  return <ChildComponent movie={props.movie}>
}Good:
Here, the movie id is a string.
const ParentComponent = (props) => {
  return <ChildComponent movieId={props.movieId}>
}
Optional: For Class-Based Components
Class Based Components are painful. Keeping that aside 😮💨. In case you are using class-based components over functional components, here is what you can do.
Prepend the current unconnected component with UnConnected and create and export a new connected component with the same name.
For example, let’s say MovieList is a component which is not connected; we would do the following. Rename MovieList to UnconnectedMovieList and create a new connected variable.
Before
export class MovieList extends React.Component {
  ...
  render(){
    return something...;
  }
}After:
export class UnConnectedMovieList extends React.Component {
  ...
  render(){
    return something...;
  }
}

const mapStatesToProps = (state, ownProps) => {
  movie: selectMovieByMovieId(ownProps.movieId)(state)
}
export const MovieList = connect(mapStatesToProps)(UnConnectedMovieList);
In my experience, this works well as in many places in the code base I was working on, I couldn’t use the connected component directly.
One can replicate such behaviour in the Functional components, too, if needed!
Ending
Connecting components directly to the state management libraries leads to much higher performance. To do this, start by adding all data to the store and creating selector functions that can select a particular data from the store. Then, connect the leaf components and move upwards to connect the root component.
I hope this guide was helpful. I have written more such guides on Redux on topics like:
- How to design a high-performance redux schema: normalization.
- Optimistic Updates using Redux. Etc.
If you have any questions, comment below, and I’ll respond! Take care!