· 6 min read
Implementing an OAuth Server Manually
Implementing OAuth server is easier than it looks and it saves money in the long run.
This blogpost will cover what OAuth is and how I went about implementing OAuth. It does not include theorotical details. It includes practical questions that lead me to the implementation.
When you read a question, you can search for it yourself. I have provided all the resources that I used along the way below too.
I’ll explain OAuth in layman’s terms in the beginning and then go on to explain it in more technical terms.
OAuth is easier to implement than developers think. There are a lot of jargons involved. But you’ll find at its core it’s very easy and cost-effective.
What is OAuth? And where it is used?
OAuth is a protocol for allowing access to a user’s data to a third party app.
OAuth is not login. OAuth expects the user is logged in and has allowed the access.
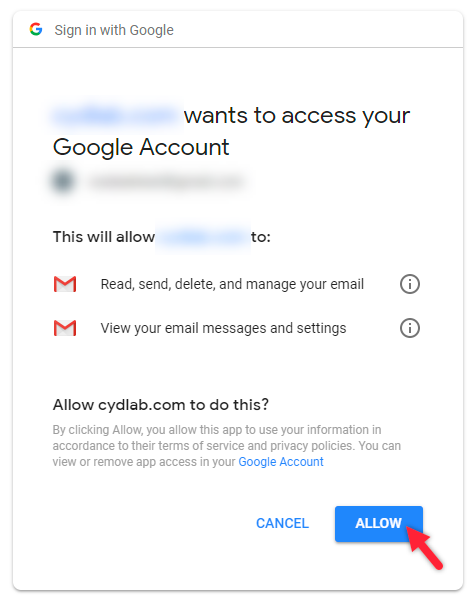
You may have seen screen pages like these where you allow one application to access data from your Google account. This is done via OAuth.
The above image is from redirecting to “authorize“ url.
How is OAuth different from Login? And how does it work
A normal login just requires username and password.
OAuth is a step that happens after login. If the user is not logged in OAuth step won’t happen.
For example, suppose you create an app called “Chain Mailer“ and you want access to the user’s Gmail data.
You initiate the OAuth flow, this means you redirect the user to Gmail with some special parameters. If the user is not logged in, he is asked to log in into Gmail but Gmail itself. Our “Chain Mailer” app has no control over what Gmail does or what the user does. We have just redirected to Gmail.
If the user logs in they’ll see the permissions page. And if they accept, the 3-Legged OAuth flow would happen between Gmail and our Application.
Note: How OAuth Flow only happened after user logged in into the service.
After the 3-Legged OAuth Flow our application would receive a special token called Authorization Token. We can use this token while accessing data from Gmail.
The Authorization Token would include information that we have the permission to access the data.
Note: From here on things would get technical
How I implemented the OAuth Server myself
I’ll split the next parts into:
- Learning Phrase
- Coding Phrase
- Nuances
Learning Phrase
Before implementing OAuth Server, I had done the 3-Legged OAuth Flow with another service myself. So, I knew what the 3-Legged flow is.
This is the first place to start learning about OAuth.
The questions you may ask here is:
- What is OAuth?
- What is the three legged OAuth flow.
- How to use the access token. → Using the access token by adding a “Authorization“ Header with value “bearer {authorizationToken}“
To implement it, I started reading up on Google, but I found it very challenging. Here’s how I learn’t OAuth and all the security concepts I needed to learn.
- I started watching a YouTube playlist this gave me a broad idea about the implementation.
- I asked ChatGPT how to implement an OAuth server.
- ChatGPT gave me useful responses that I was able to ask followup questions to.
- My questions included:
- How to implement an OAuth server.
- What is JWT token?
- How to I validate a JWT Token?
- What is RSA algorithm?
- I further jumped into learning about RSA via YouTube.
- Here’s my post on RSA: RSA Algorithm
- What’s JWK?
- What’s the difference between JWE and JWS?
- How to define different scopes?
These gave me a basic idea of what to do.
I realized that I just need to create a 3-endpoints and one permissions page.
The Authentication (Login) is already handled. The permissions page comes one later after the Login one.
Implementation Phase
With OAuth multiple third party application can register and access our service.
This means I needed to store information about multiple applications.
I created a DB record called OAuthClient where I stored
clientId- A unique id given to the external applicationhashedClientSecret(a hashed version of client secret. Similar to how password is hashed and saved.)scopes(permissions that are to be provided to application)redirectUri(uri where I would have to redirect).
I would generate a clientId, clientSecret and add in scopes and provide these data to third party app.
I created another DB record where I store information about the token given. I called it OAuthToken. This would include the following.
clientIdcode→ this is a temporary code that would be resent from the external app to my oauth server during stage 3 of 3-legged Oauth Flow.accessTokenGiven→ A boolean value representing if the OAuth token was already granted for the particular code.
Using these, I was able to issue OAuth tokens.
I also needed JWT token generation.
I used a library to create JWTs and included all the information related to the user application and scope.
For generating JWTs I had to learn what PEM file is.
I also had to create a public JWK endpoint which my api gateway would access to validate the token. JWK is a standard way of sharing public keys for JWT token.
I also added a record for scopes. Which was something like
scope→ unique name of the scopedescription→ unique description of the scope used to show user what to do in the permissions page.
Here’s my post on how I choose to define scopes: Defining Scopes for your OAuth Service
Nuances
OAuth works protocol is snake cased
I initially implemented all endpoints as camel case. But it did not work. Then I had to modify it to snake case.
OAuth formats
Formats within OAuth protocol are very fixed. Certain endpoints accept and return data in a particular format only and they don’t have randomness.
For example, the token endpoint would always be in the following format.
{
  "authorize_token": "{jwtToken}",
  "refrest_token": "{token}",
  ...
}
We can’t extend the format by adding our own stuff. But mandatory things would be preserved as it is. For that I had to read up the main OAuth specs a few times.
My thoughts
After implementing OAuth server myself, I feel confident about other protocols. Protocols may seem too technical but at their core they are really easy.
Implementing OAuth helped me understand and get better at computer security. And also, helped me step into a much better principle developer role.
Resources
Jump around these
An Illustrated Guide to OAuth and OpenID Connect
OAuth 2.0 and OpenID Connect (in plain English)
ChatGPT
Main Spec: The OAuth 2.0 Authorization Framework